3.25.2012

Ci-lime-tro Chicken and a side of Ci-lime-tro Quinoa Summer Salad

Pin It It's finally grilling season.  The temperature has been hovering in the mid 60's for the past week, so we got to start our weekly Saturday grill sessions a bit early this year.  Last year we grilled, regular chicken and burgers all summer long... this year, I think we'll spice it up a bit.  I love lime, it's like a burst of summery flavor.  Before I ever really cooked anything we would make chicken marinated in Newman's Own Lime Vinaigrette with a dash of ginger, which was always a favorite.  This version is definitely a step up.  We started off this grilling season with Ci-lime-tro Chicken and a side of Ci-lime-tro Quinoa Summer Salad, which was the perfect compliment.  Next time, I would just chop the chicken up and throw it in the salad for an all in one dish.  Read on for the juicy details. 

Start by cooking the quinoa for Ci-lime-tro Quinoa Summer Salad.  My quinoa is always fluffy ever since I started following these directions on how to make fluffy quinoa.   You will want to start the quinoa ahead of time so it has time to cool before the chicken is ready.  While your quinoa is cooking start marinating the chicken  in the juice of 3 limes, 1 1/2 tablespoon sugar, lots of freshly ground cracked pepper, a dash of salt, a teaspoon of Olive Oil, and about 10 cilantro leaves chopped.  Let the chicken marinate for at least an hour in the fridge (the longer the better to get the best flavor).  When its time, fire up your grill.

Grill your chicken to perfection following these tips from Kayln's Kitchen, 

Dice a tomato, avocado and chop some cilantro for your summer salad.  The best part about this meal is that there is little prep!  You are basically done prepping for your salad at this point.


 Ci-lime-tro Chicken
adapted from My Recipes

Ingredients:
2 boneless skinless chicken breasts
the juice of three limes
1 1/2 Tbsp sugar
1 tsp freshly ground pepper
1 tsp salt
1 tsp Olive Oil
10 cilantro leaves, chopped

Directions:

Mix lime juice, sugar, pepper, salt and olive oil.  Stir until sugar is dissolved.  Add chicken and cilantro.  Mix in a sealable plastic bag and let marinate for at least one hour in the refrigerator.  Grill to perfection.

Voila! Perfectly marinated chicken breast.

Ci-lime-tro Quinoa Summer Salad
Adapted from myrecipes.com
 Ingredients:
3/4 cup (uncooked) quinoa, cooked and cooled
a can of black beans, drained and rinsed
3/4 cup corn kernels
1 large tomato, diced
1 avocado, diced
2 limes, juiced
1 tsp cumin
roughly 3-4 Tbs chopped Cilantro
Drizzle of Olive Oil
Salt & Pepper
*I made this again the other day, and added some chopped yellow pepper, which made it even better because it added the perfect amount of crunch!  I would definitely recommend.

Directions:

Cook quinoa and chill.  Mix quinoa, black beans, corn, tomato, avocado, lime juice, cumin and cilantro.  Drizzle with Olive Oil.  Salt & pepper to taste. Chill and serve.  

Bon Appetit!  Super easy and the flavors come together perfectly.  Perfect for a grill out side dish. 

Pin It

3.21.2012

Portabella Fajitas

Pin It We are always trying new vegetarian recipes to get more bang for our buck while grocery shopping. Big juicy portabellas are an excellent replacement for meat because of their meat like texture and also have 5g of protein in one cup. We will definitely be incorporating portabellas in our cooking in the future.. yum.  These Portabella Fajitas adapted from Hungry Girl on the Food Network were so good and not to mention, good for you!

Chop 2 small red peppers, 1 yellow pepper, 1 medium onion and 2 portabella caps.  Dice two cloves garlic.
 Heat a large saucepan with a tablespoon of oil and sautee the peppers, onion and garlic for about two minutes.
Add the mushrooms and spices.  Mix.  Cook until mushrooms, peppers and onions are softened.  Squeeze the juice of half of a lime over the portabella mixture.

Portabella Fajitas
adapted from Hungry Girl on the Food Network

Ingredients:

2 Portabella Mushrooms, stems removed
2 small red bell peppers
1 small yellow pepper
1 medium onion
2 cloves garlic, minced
1 tbs olive oil
1/4 tsp. salt
1/8 tsp. chili powder, or more to taste
1/8 tsp. ground cumin
Cracked Pepper
1/2 of a lime

For Serving:

Warmed Torillas Sliced Avocado
Shredded Cheese
1 recipe Pico De Gallo as follows
Dallop of Greek Yogurt

Directions:

Slice Peppers, Mushrooms and onions.  Mince two cloves garlic.  Heat a large saucepan with one tablespoon of olive oil to medium heat.  Sautee peppers, onions and garlic for two minutes.  Add Portabellas and chili powder, cumin, salt and pepper.  Cook until peppers and mushrooms are softened.  Squeeze the juice of half of a lime and mix.


Serve over warmed tortillas and top with sliced avocado, shredded cheese, Greek Yogurt and Pico de Gallo.

Pico De Gallo

Ingredients:

3 Tomatoes
1/2 of lime, juiced
1 clove garlic, minced
1 Tbs Olive Oil
2 Green Onions, chopped
8 leaves of Cilantro, roughly chopped
Salt and Pepper
Optional: chili pepper


Directions:

Dice the tomatoes and set in a small bowl.  Mix in minced garlic, juice of half of a lime, olive oil,  chopped green onions and cilantro.  Mix.  Salt and Pepper to taste.  Add a chili pepper, if you prefer spicy pico. 

Pin It

3.11.2012

Tiramisu

Pin It *Dessert Post One.  I don't generally make desserts, which is why when my friend came over for dinner she brought the usual delicious Belgian chocolates and was quite surprised to find the tiramisu in the fridge.  Belgian chocolates are delicious.  Seriously, the best.  So, I normally think, why make dessert when I live in the country that has the most decadent chocolate in the world?  If you are not so lucky, to live in such a country... this tiramisu is delish and comes highly recommended to serve for dessert.  We learned this recipe in our cooking class in Florence, so it is the way the real Italians do tiramisu.
*I made this post before Nutella Cupcakes... but those were so good this had to wait.. but this is good, too!!!!  

Serve in a martini glass to make it über fancy (and get some use out of the martini glasses that have been sitting on your shelf since you started watching Sex and the City).  **Beware, by the time you complete this recipe, one of both of your arms will have fallen off.

Start by brewing two cups of strong coffee.  Next separate the egg whites and yolks into two medium size bowls.  Mix the sugar with the egg yolks until smooth.
 Add the marscapone to the egg yolk mixture.  Mix until even and set aside.

Begin whisking the egg white until into a foam like substance.  This is when your arm might fall off unless you are a real macho man. (my whisk broke trying to mash potatoes with it... note to self: get a potato masher)  Whisk until foam like substance is stiff enough it will stay in the bowl while tipping it upside down. If you have some guts, lift it over your head to make sure it doesn't move (this is a good test to know whether or not you have the right consistency).


Gently fold the egg whites into the yolk mixture with a wooden spoon until uniform.  If you are not familiar with folding, click on the link above in order to avoid disaster (trust me I speak from experience- the last time I used a folding technique, before knowing at all what folding was, I stirred and stirred and ended up with a completely separated lumpy liquid mixture). Chill for a half hour.
Chop or shave the dark and white chocolate, then set up your station to start dishing out the goodness.

Start layering a spoonful of the mouse like mixture into the glasses.  Break lady finger in half and dip in coffee.  Layer in.  Sprinkle with unsweetened cocoa powder.  Continue for two-three layers until mixture is used up and top with the chocolate shavings.  Chill for 2 hours before serving.


Tiramisu
Serves 5

Ingredients:
2 cups freshly brewed coffee
2 fresh* eggs room temperature
1/3 cup sugar
500 grams marscapone cheese
10-15 lady finger cookies
shaved or chopped white and dark chocolate
unsweetened cocoa to sprinkle

*note: Use only fresh eggs purchased that day, as this recipe contains raw egg.  See more about the risk factors here:  http://www.bbc.co.uk/food/egg" target="_blank">
http://whatscookingamerica.net/Eggs/RawEggs.htm" target="_blank">.
Please exercise caution when preparing dishes with raw eggs and use them right away (do NOT save for leftovers).

Directions: 
Start by brewing two cups strong coffee.  Separate the egg whites and yolks into two medium sized bowls.  Stir the sugar into the yolks until smooth.  Add the marscapone cheese and stir until uniform.  Set aside.  Begin whisking the egg whites until into a stiff foam like texture.  This will take some time.  Gently fold the egg whites into the yolk mixture with a wooden spoon.  Chill in fridge for half hour. 


Layer in a spoonful of mouse like mixture into serving dish.  Break lady finger cookie in half and soak in coffee.  Layer cookie into serving bowl.  Sprinkle with a dash of unsweetened cocoa powder. Repeat until mixture has been used up.  Top with chocolate shavings.  Refrigerate for 2 hours before serving.  Bon Appetit!


Pin It

3.09.2012

Garden Vegggie Quinoa Soup

Pin It Looking for a way to fit more veggies into your diet??  Looking for a way to fit more veggies into your diet while enjoying every minutes of it??  If you answered yes to either of those questions, read on.  If you answered no, read on anyway (that just reminded me of a choose your own adventure book... weren't those the best?).  Not only is this soup full of veggies, it also feature super food quinoa.  

Anyway, as I already mentioned I love soup, especially nice hearty soups in the winter, but this soup would be great in summer as you could use all your fresh veggies from the garden.  Which is why  I named this soup Garden Veggie Quinoa Soup.  Since it is March, that's not really possible, at least not where I am from (or should I say, live?  In either case, it's accurate).  Just when I thought spring was around the corner.. it snowed.  :(  However, that made this soup even more perfect.

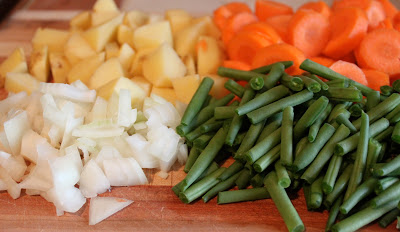
Lots of veggies... Green beans are pictured twice, you'll have to forgive me.  Or put in double the amount, that isn't a bad idea either!  Start chopping them, onions, potatoes, carrots, green beans, zucchini and spinach or whatever is growing in your garden or about to grow mold in your fridge.  Throw it all in.  Do. not. hesitate.  I think some leeks would be especially delicious, but didn't have any on hand. 

Heat olive oil in a large stock pot to medium heat.  Throw in diced garlic and onion.  Saute for 1 minute.  Add Potatoes and Carrots.   Saute for 3-5 minutes.  Add Green Beans and Zucchini.  Saute for 10 minutes.  Sprinkle in some sage, oregano and salt and pepper.
Throw in a large can of stewed tomatoes and its juices and 4 cup veggie broth.  Bring to a boil and let simmer until potatoes and carrots are softened to your liking. 
   While the soup is simmering, start making your quinoa.  Rinse quinoa well (at least twice).  Heat small sauce pan on high.  Pour in rinsed quinoa.  Toast for a few minutes (this brings out the nuttiness).  Add water.  Bring to a boil.  Reduce heat covered for 15 minutes.  Turn off heat, leave covered for another 5 minutes.  Remove cover and fluff.  Strain any excess water that may be present.
Add spinach and cook until wilted.
Add fresh parsley, a squeeze of lemon and cooked quinoa.  Mmmmmmmm.  Looks hearty and delicious.  This soup is hearty enough to eat as a meal on its own.

Garden Veggie Quinoa Soup

Ingredients:

2 Tbs olive oil
1 small onion, diced
3 cloves garlic, minced
2 medium potatoes, chopped
3 carrots, peeled and chopped
1 cup fresh green beans, cut into threes
3/4 cup zucchini chopped
dash of sage
salt and pepper
1 large can stewed tomatoes
4 cups vegetable broth
2 cups spinach
10 leaves fresh parsley
squeeze half of a lemon
1 cup quinoa
1 1/2 cup water (for quinoa)   

Directions:

Heat olive oil in a large stock pot on medium heat.  Add onions and garlic.  Saute for 1 minute. Add carrots and potatoes.  Saute for 3-5 minutes.  Add green beans and zucchini.  Saute for about 10 minutes.  Add a dash of sage and salt and pepper.  Add stewed tomatoes with juices and vegetable broth.  Bring to a boil.  Simmer until potatoes and carrots are softened to your like.

Rinse quinoa 2-3 times.  Pour into a small sauce pan over high heat, toast 2-3 minutes.  Add water.  Bring to a boil.  Reduce to a simmer and cover for 15 minutes.  Turn off heat (leave cove on) for five more minutes.  Strain any excess water.  

Add spinach to the soup and cook until wilted.  Add fresh parsley, squeeze of lemon and quinoa. 

Top with some freshly grated Parmesan for an extra kick of deliciousness! 

YUMMMMMMMMMMMMMMMMMMM....Bon Appetit!  


Pin It

3.06.2012

Nutella Cheesecake Cupcakes with Pretzel Crust

Pin It If I could swim in a sea of Nutella..... well, that would be amahzing*.  I just recently tried Nutella (after being in Europe for OVER a year!).  I was missing out... and those of you who have yet to do so, do it.  Immediately.  Our new favorite snack is pretzels dipped in Nutella.  To. Die. For.  Which is what inspired this post, Nutella Cheesecake Cupcakes with Pretzel Crust.  Lucky for me, it was buy one get one half off at the store yesterday.  I should have bought more (it's the part of me that is my mom... stock up on a good deal, she brings it to a whole other level).  Taste Tester thought buying two jars was crazy (he is the crazy one for even thinking that). 

*yes, I am obsessed with Happy Endings and Penny is my fave... Oh! and she said she was "tie tie" in the Valentine's Day episode... she must have got that phrase from me. 

 While 1650 grams of Nutella should tied me over for a while, I think I will go back tomorrow for two more jars of the creamy, chocolaty yumminess (I will need it, especially after making this recipe).

Start by preheating the oven to 325 F (16 3C).  Crush the pretzels and mix with butter and brown sugar.  Use a food processor if you have one.  I went to town with my mortar and pestle and it worked just fine.


                                  Layer cupcake liners with the pretzel crust.  Smoosh it down with a pestle (or the bottom of a cup or glass). 
 
Cream together the cream cheese and sugar.  Add eggs and flour.  Beat on medium until texture is smooth and even.
 Spoon in 1/2 of the cheesecake filling.  Smooth out with a butter knife or back of a spoon.
 Add the Nutella to the rest of the cheesecake filling.  Then top over the first layer.
Bake 20-25 minutes, until set.  Cool on rack and chill.
No need to say more, okay I will anyway......... decadent creamy cheesy chocolaty hazelnutty crunchy nutella-y goodness. 


Nutella Cheesecake Cupcakes with Pretzel Crust

Ingredients:

Crust:
1 1/2 cup pretzels 
2 Tbs unsalted butter softened
1 Tbs brown sugar

Filling:
16 ounces cream cheese at room temperature
1 cup sugar
2 organic eggs at room temperature
2 Tbs flour
1/3 cup Nutella


Topping:
Extra Nutella
Chopped Hazelnuts

Directions:

Preheat oven to 325 F (163 C).  Crush pretzels using a food processor or mortar and pestle (anything will do, just crush those bad boys).  Add the brown sugar and butter.  Blend until uniform.  Layer a cupcake tin with 12 cupcake liners.  Spoon a spoonful of the crust in each liner.  Smoosh down with a small glass (or pestle).   

Put the cream cheese and sugar in a small mixing bowl.  Mix together until smooth.  Add the eggs and flour.  Beat until mixture in uniform.  Spoon 1/2 of the cheesecake mixture over the crust.  Smooth the top with the bottom of a spoon or butter knife.  Add the Nutella to the remaining cheesecake filling.  Layer over the first cheesecake layer.  Smooth the top.  Bake for 20-25 minutes, until set.  Cool on a wire rack and chill.

Frost with a layer of Nutella (You get the picture, I like Nutella).  Top with chopped Hazelnuts and serve. 

Melt in your mouth goodness.  Bon Appetit!!  


 Officially adding a Nutelleria to the Euro Bucket List...Maybe a visit on World Nutella Day 2013 is in order??
Pin It

3.04.2012

Pico Scramblers topped with Avocado

Pin It One of my favorite ways to jazz up scrambled eggs is to throw in some fresh pico de gallo. It adds a burst of summery flavor. Though it's not even close to summer, sadly, I did find some pretty good looking tomatoes at the grocery store the other day. Perfect for some home made pico. Can't wait until we have our own red, juicy tomatoes growing on the back porch.. about 5 months and counting.

Start with some fresh tomatoes, garlic, lime, a bit of EVOO, cilantro (and some green onions I forgot to picture, don't forget to add those to the pico.. it is a must!).


Pico De Gallo

Ingredients:

3 Tomatoes
1/2 of lime, juiced
1 clove garlic, minced
1 Tbs Olive Oil
2 Green Onions, chopped
8 leaves of Cilantro, roughly chopped
Salt and Pepper
Optional: chili pepper

Directions:

Dice the tomatoes and set in a small bowl.  Mix in minced garlic, juice of half of a lime, olive oil,  chopped green onions and cilantro.  Mix.  Salt and Pepper to taste.  Add a chili pepper, if you prefer spicy pico. 

Onto the Pico scramblers with Avocado

Ingredients:

4 organic eggs
1/2 cup milk
1/2 red pepper, chopped
1/2 cup shredded cheese (I used Gouda, it was good)
1 recipe Pico de Gallo
3 whole wheat tortillas (1 for me, 2 for my Taste Tester)
1 avocado, diced
salt and pepper

Directions:

Begin heating tortillas in oven.  Whisk together eggs and milk.  Salt and Pepper the mixture.  Heat a medium sized greased skillet to medium heat.  Once heated, pour in the egg mixture.  Stir occasionally.  Add the red pepper and cheese.  Add in two generous spoonfuls of pico de gallo.  Cook to desired consistency.  Serve over warmed tortillas.  Top with diced avocado and extra pico.

Garnish:
Tabasco (although, these eggs must have been flavorful enough, because my Taste Tester didn't even add Tabasco, which is a first!)

Voila!
I probably would have added some black beans to this dish, if they were readily available here.  In Belgium, I need to cook them myself, which is quite time consuming... so none for me, but would be extra delish for you!  Bon Appetit!  Nom Nom!
Pin It

3.03.2012

Sweet & Sticky Japanese Style Drumsticks

Pin It I have been wanting to prepare drumsticks for a while.  I figured now that I am over my fear of touching raw chicken, it's time to move on from only using chicken breasts.  Onto drumsticks!  I love drumsticks... who doesn't?  Looking for new chicken recipes I stumbled upon  Japanese Mum's Chicken on Food.com.   A woman posted this recipe she made with the Japanese study abroad student she was hosting.  I have adapted the recipe slightly, with some additional inspiration/guidance from Gina's Asian Glazed Drumsticks at theskinnytaste.com.  The end result:  they were fantastic, or should I say "素晴らしい!"  It's no wonder they are one of the most popular recipes on the site.  Someday, I would love to welcome a study abroad student in my home, if only for them to teach me their mum's special recipes!  There is no need to get take out, when you can make this fabulous recipe! 

 Start by prepping what you will need for the dish.  We had stir fried veggies on the side, snap peas, carrots and mushrooms, but any veggies would work!  
 Heat a large skillet on high heat with a small amount of oil (I used sesame oil).  Brown drumsticks for abut 3 minutes.  Add the garlic and sautee for 30 seconds (I like my garlic sauteed).
Add water, soy sauce, balsamic, brown sugar and chili pepper flakes.  Bring to a boil, then simmer covered for 20 minutes, flipping drumsticks occasionally.  Since I am used to cooking chicken breasts, I was very worried the meat would become dry, but with the skin on and the bones, it stayed juicy.
 After about 20 minutes, I removed the chicken and set aside.  Then, I brought my sauce to a boil in order to reduce the sauce.  This took some time (about 20 minutes for me), but eventually the sauce thickened.  I added the chicken back in for about 5 minutes, to make sure it would be nice and warm for serving.  This is my first experience with making a reduction sauce, so I was a little timid at first in fear the sauce would burn, but it turned out great!  

Serve over a bed of Basmati rice, top with glaze, some toasted sesame seeds and green onions.  Add more chili flakes if you are feeling spicy. 


Sweet & Sticky Japanese Style Drumsticks 
As adapted from Food.com's Japanese Mum's Chicken & Gina's Asian Glazed Drumstick

Ingredients:
8 drumsticks, skin on
1 tsp oil (I used sesame oil)
2 cloves garlic, minced
1 1/2 cup water
3/4 cup balsamic vinegar
1/2 cup soy sauce 
2 1/2 Tbsp brown sugar
1 tsp chili flakes

for garnish:
1 tsp toasted sesame seeds
chopped green onions


Directions:

Heat a large skillet on high heat with a small amount of oil.  Add the drumsticks, browning them for about 3 minutes.  Add the minced garlic.  Add water, balsamic vinegar, soy sauce, brown sugar and chili flakes.  Bring to a boil.  Reduce to a simmer, covered for about 20 minutes, turning your drumsticks periodically.  At this point, I removed the chicken to start my reducing sauce (in order to avoid over cooking).  Bring the sauce to a boil until sauce thickens (this took about 20 minutes).  After sauce begins to thicken, add the chicken back in for about 5 minutes.  Serve over rice with a side of steamed veggies.  Top drumsticks with extra sticky glaze, toasted sesame seeds and some chopped green onions.

Oh man, they were Delish!!!!!!!  Bon Appetit!

Pin It